

By Katie Azevedo, M.Ed.
One of the most helpful mental and productivity strategies I have ever learned is how to do a Brain Dump. I did not invent this strategy, or its name, but there’s no doubt I use it more than anyone. On top of that, it’s one of the greatest strategies I teach my clients – and it’s a strategy they can take with them long after we stop working together. Also, while I did not invent the concept of Brain Dumps, I do put a spin on them that takes them to the next level. More on that in a bit.
Simply put, Brain Dumping involves dumping (writing) every little thing (every.little.thing.) from our brains onto paper. Yes, paper. There is a time and a place for technology, but this isn’t one of them.
When we get things out of our heads onto paper, many magical things happen. For example, we can:
- reduce anxiety about forgetting things
- acknowledge thoughts that have been bothering us
- discredit or eliminate unnecessary thoughts or tasks
- “see” what’s been on our mind
- prioritize what needs to get done
- distinguish between things that we can control and things that we can’t control
Dare I say that Brain Dumping is basically like cheap therapy?
Joking aside, knowing how to do a Brain Dump, and doing them regularly, can significantly help us face and sort through everything that’s on our mind — both good and bad, real or imaginary.
I recommend doing a Brain Dump any time you’re feeling stressed or overwhelmed. This might be once a month, or it could be once a day. You do you. Also, if you’ve really been feeling stressed out lately, read this post with 5 tips for feeling less overwhelmed in school.
Here are the steps for how to do a Brain Dump
PRE-DUMP
Get paper. Can be loose-leaf, or you can keep all your Brain Dumps in a dedicated notebook. Or use a napkin. Whatever.
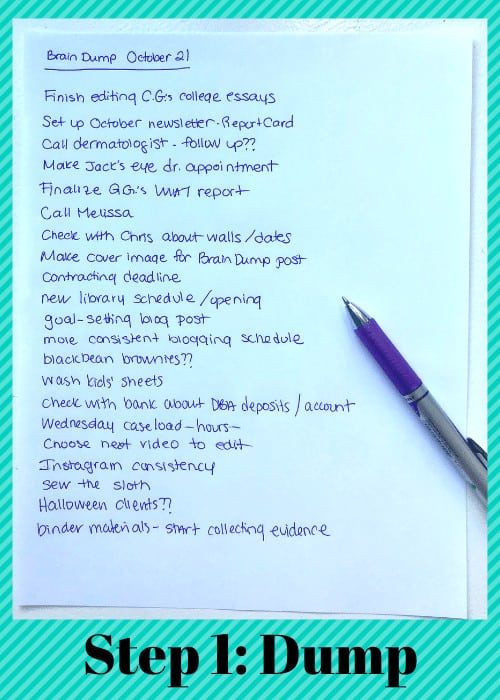
STEP 1: DUMP
Without filtering or censoring yourself, write down every little thing that’s on your mind. Do this in a list format. Some people like to set a timer – try doing that if you’re curious. This includes:
- Things you have to do
- Things that are bothering you
- Questions you have
- Ideas you have
- Random thoughts
- People you’re thinking about
- Upcoming appointments
- Anything
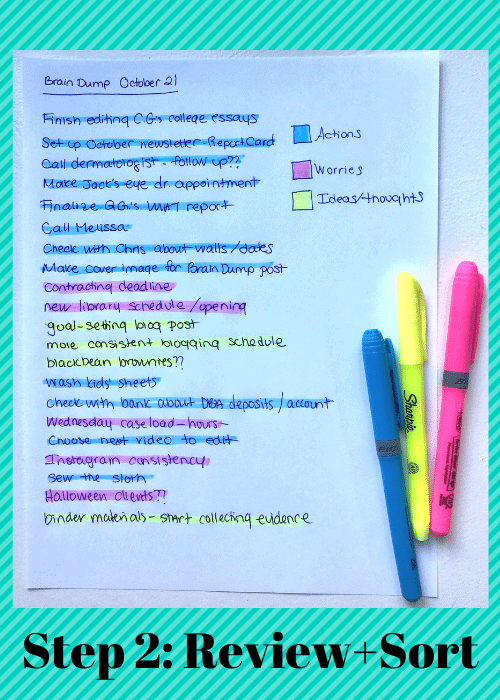
STEP 2: REVIEW AND SORT THE BRAIN DUMP
This is the part where I put my own twist on the classic Brain Dump. In other words, most Brain Dump enthusiasts will end the process here, arguing that the main objective is just to get things out of your brain. Sure, yes, that makes us feel better, but it doesn’t help us get our things done. So I take it one step further in the name of productivity. Because.
Once you’re absolutely sure that you have dumped every thought from your head onto paper, it’s time to review your list and sort each item into one of three categories:
- Action (things to do) Examples include: Scoop litter box, write history paper, call Grandma, study for chemistry
- Ideas for later (non-urgent ideas you could come back to) Examples include: ideas for future blog posts, theme ideas for your next party, a new playlist you want to create, etc.
- Worries / non-changeables (things that bother you but you can’t actually do anything about) Examples include: worrying about your friend’s weird text, wondering what you got on your English test, worrying about finding a job
For this step, I suggest using three different colored highlighters – one for each category. Highlight all Actions in one color, all Ideas in another, and all Worries in another.
Once you become a Brain Dumping wizard, you can experiment with your own categories, beyond the three I outline here. For example, you could add subcategories like Errands or Phone Calls – whatever suits your life and needs. Here’s an article with other options for categories as well – they’re not my favorite categories for students, but it could still be helpful to some of you.
Ultimately, this step creates a visual that can be surprisingly helpful – for your emotions and your productivity.
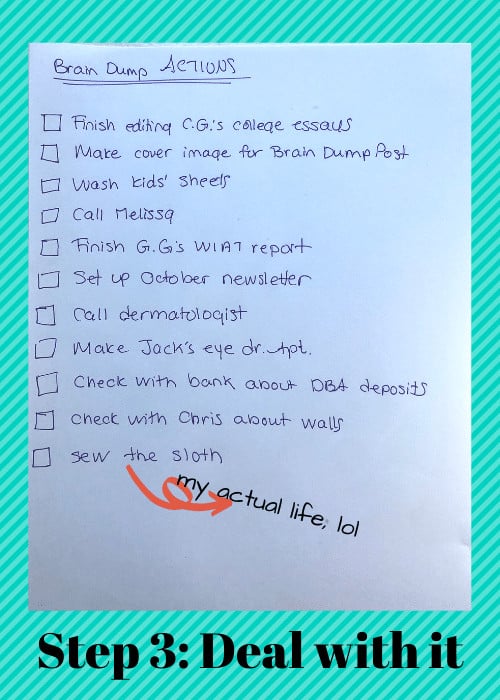
STEP 3: DEAL WITH IT
There are three components to this final step of the Brain Dump. All three components require that you DEAL with your categories in different ways.
- First, cross off all the Worries. There is nothing you can do about them. If there was something you could do about it, you would have made it an Action. The very act of acknowledging these worries and writing them down is all you have to do. These worries will no longer serve you. Need more tips for dealing with anxiety? Here you go.
- Second, move anything you’ve highlighted as an Idea to a new spot – perhaps as a new list, a page in the back of your planner, or as a memo in your phone. Come back to this list for inspiration whenever you feel like it.
- Lastly, and most importantly, deal with the Actions. Some of these items will be small and easy, such as call the dentist or email Mrs. O’Brien. Others will be more challenging, such as write history paper or figure out how to talk to Julie.
How you go about tackling and prioritizing the Actions is up to you. You can do the small stuff first to build momentum and confidence, or you can do the big stuff first so it doesn’t loom over you anymore. Up to you. There are benefits to both approaches. Also, try using the Power Hour Strategy to blow through some of these Actions.
Regardless of how you approach your Actions, at least now, after going through steps 1 and 2 of the Brain Dump, you have clearly separated and categorized everything in your head. You will no longer feel like you have 20,000 things to do. Instead, you will have visual evidence right in front of you that most of what you had swirling around in your head was simply an idea/thought about something, or a worry that you can’t do anything about. Not everything swirling around in your head required you to DO something. Huge difference.
Again, knowing how to do a Brain Dump (Step 1) and knowing what to do with that information (Steps 2 and 3) are such a helpful strategies for reducing anxiety and increasing productivity. We can sometimes be our own worst enemies – and this simple strategy can help us break through that barrier.