
By Katie Azevedo, M.Ed.
In this blog post, I share strategies for how to get organized for final exams. But you can also use the strategies to get organized for midterms or any kind of exam that covers multiple units.
I have plenty of tutorials about how to study for exams including the following:
So, if you’re looking for “how to study” tips, you’ll want to check out those guides as the next logical step, after you’re done here.
But in this blog post, I’m focusing on the organization part. That’s because studying for finals and midterms is so much easier when you’re organized and when your study materials are ready to be… well, studied.
The strategies below will help you do exactly that. They’ll help you get to a place where you are ready to put in the cognitive effort to learn the content using active recall study methods.
How to Get Organized for Final Exams
The last thing you want to do when you sit down to study for final exams or midterms is to spend half your time finding the things that you’re supposed to study. Or worse, figuring out what you’re supposed to study in the first place. When you sit down to study, you want to hit the ground running and use all your time learning.
Note: To make things smoother for your next round of final exams or midterms, use these 7 note organization tips from the beginning.
1. Get Totally Clear About What’s on the Test
It’s a waste of time to study the wrong things, so if you don’t start with this tip here, the other steps will be pointless.
Figuring out what’s on your test is an important first step because it helps you know what materials you need to organize in the first place.
Your teacher might give you the information as a clear study guide that outlines everything you will be tested on, or they might be more vague and give only general guidance, such as the test will be on everything from Semester One.
If you’re lucky enough to have a teacher who gives you a detailed list, you’re good to go on to the next step.
But if you don’t have a clear list, you must make one. Let’s say for example you’re told your final is on everything from Semester Two. Your first step would be to clarify what that means.
Here’s how:
- Go back into your learning management system, your notes and your syllabus, and identify what material starts at the beginning of the semester.
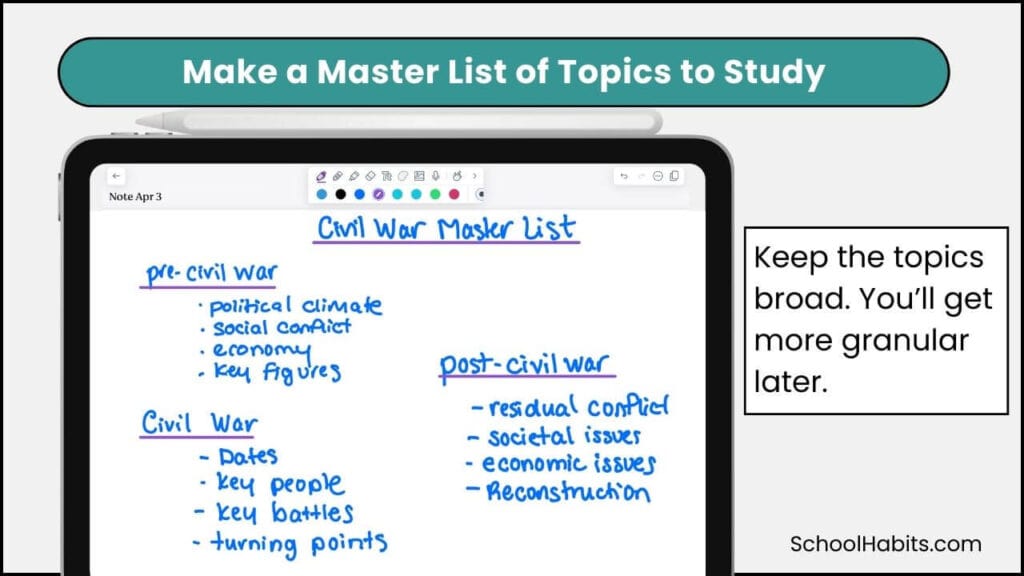
- Next, write down everything that’s included in this time span. You could do this in the form of a simple list or be more granular and do it in an outline format. This list should be top-level and include just the key topics. For example, if you know the US Civil War will be on your test, you would write down general Civil War categories, like in the image below.
2. Gather All Relevant Materials
You’ll most likely have materials in multiple places, including your learning management system, notes, digital files, physical notebooks and physical papers, and perhaps even in media like videos.
The point of this step is to gather all of these resources in one spot as much as possible.
Below are some suggestions for how to do this:
- Print out any digital readings and combine them with your paper materials (if you like to study from physical materials vs digital).
- Go into all your physical folders and binders and pull out everything related to the topics on the list you made in Step One.
- Mark with a sticky note all textbook pages that are related to the information you’ll have to study.
- Make a new digital folder in Google Drive/OneDrive, name it Finals or the name of your test and put all digital files in that one folder. If there’s a file you’re not the owner of, make a copy and then move it to the folder.
- For videos that contain information you’ll need to study from, you have two choices:
- copy and paste the video links into a document and put that document in the digital folder you just created, or
- use just the notes you hopefully took on the videos and drag those notes into the folder.
You don’t have to use every strategy from the list. But the more you use, the more organized you’ll be for finals. The key is that you want to consolidate as much as you can, which means making digital resources physical if you prefer that, or making physical resources digital if you prefer that route.
3. Consolidate and Reduce Your Materials
Over several units, a semester, or whatever time span your test covers, you are going to accumulate a lot of materials that don’t necessarily make good study resources.
This step is all about narrowing down the big pile (digital or physical) into a condensed bundle of materials that you can eventually make study resources from.
You’re going to have duplicate content, readings that don’t contain relevant information for the exam, redundant problem sets, and things of that nature. In this step, we reduce your materials to only the best.
Here’s how to consolidate and reduce your study materials:
Get rid of duplicates. If you have a digital copy and a paper copy of the same thing, pick one to keep and toss the other.
For exams like math and chemistry that involve equations or formulas, keep only materials with the most helpful practice questions. For example, if you have five homework assignments with similar practice questions, keep only the one or two best ones.
Always keep old tests and quizzes, as these make incredible study resources. Here’s exactly how to turn quizzes into study guides.
It’s okay to get rid of materials that contain information you are 100% confident with. But be careful here: don’t just toss materials that you think you know. You need to test yourself before you get rid of it.
Consider clustering units or topics together in study “packets.” Use a paper clip for papers. For digital materials, this could mean creating sub-folders for each unit within the folder that you created in step 2D. Or, you could rename all digital files with a number in the title corresponding to the unit or category it belongs to. For example, if you have seven digital files (PowerPoints, PDFs, digital notes, etc.) all about Chapter 5 in your US Civil War unit, you could rename each of those documents to begin with the number 5.
How to Get Organized for Final Exams: 2 Critical Next Steps
The above three strategies teach you how to get organized for final exams or midterms. But your work doesn’t stop there. If you follow those tips, you’ll have yourself a neat and concise set of quality study materials that you now need to do something with.
Remember, studying is not about looking over notes or rereading textbooks. You have to do something with the material to get it inside of your brain. In other words, simply reading and “looking over things” is essentially a waste of time.
So you have two more steps after you get organized for finals with the tips you just learned. Below are the next two steps of your study process and resources that show you how to complete both steps.
1. Schedule Your Study Sessions.
It takes time and repetition for knowledge acquisition. In other words, a single epically long study session is entirely pointless. You must use spaced repetition when planning out your study sessions.
Space repetition involves using a calendar to map out what days and times you plan to study specific material. Now that you have study packets organized and clipped into clusters, you can see how much you have to study. This makes it easier to plan which days you will study what.
For example, if you have eight categories to study, you might need 12 to 16 short study sessions to get through the material. Remember, short frequent study sessions are best. So aim for 25 to 45 minutes per session.
2. Make Your Study Materials.
From the materials you gathered and organized in steps one through three above, you have to make some kind of way to test yourself. We don’t study our materials: we make study materials from our materials. We’re talking quizzes, flashcards, blank diagrams, blank timelines… anything that involves active recall.
If you’re not using active recall study methods to study the material you organized, you’re not really studying.
There are various ways to study by making active recall study materials. To start, here are 10 Different Ways to Study with Index Cards. You can also make blank tests from old tests and quizzes, use the blurting method, try interleaved practice, or any other study method that involves you trying to retrieve information without looking at your notes. After all, this is exactly what you’ll have to do for your final exam, right?
- Bonus: Here are 8 tips for what to do on the night before each exam.
- Do you have final projects instead of final exams? Here are 5 strategies to get an A on your final projects.
- Dealing with a disorganized teacher? Here are 6 essential strategies.