


By Katie Azevedo, M.Ed.
If you’re looking for tips for taking digital notes, and you’re a student or a working professional, this blog post is for you.
Note-taking is both an art and a science. In other words, the best note-taking systems incorporate a few tried-and-true note-taking principles while also leaving room to modify your note-taking style to fit your personal preferences.
Some people prefer taking notes on paper. Others like using a stylus on an iPad or tablet. And others swear by typing digital notes in a Google or Word Doc.
If you’ve read any of my other note-taking tutorials or watched my note-taking videos on YouTube, you’ll know I almost always suggest that students take hand-written notes instead of typed notes. (Taking notes by hand includes using a pen and paper or using a stylus on an iPad or tablet.) Here are the pros and cons of digital notes vs. paper notes.
There are many reasons why I steer most students away from typing notes. Those reasons have to do with learning the material (kind of a big deal, right?), but some students still prefer to type. Therefore, in this blog post, I’m sharing 5 tips for taking digital notes, the kind of digital notes that you type into a document and not “write” on a tablet.
5 Tips for Taking Digital Notes
Whether you’re taking digital notes during a lecture class or meeting, or you’re typing notes as you read from a text, the following five tips should help you create a set of notes that are clear, helpful, and organized. After all, the entire point of note-taking is to create a resource that will be helpful to you in the future. If your notes don’t serve an actual purpose, they’re pointless.
1. Choose Your Format and Stick to It
There are different ways to format your digital notes, and for the most part, it’s best to use one format for all your classes. You can make exceptions for courses like math, chemistry, and other courses that are equation-based – but stay consistent for language-heavy classes.
You have two primary choices regarding the format of your digital notes:
- The style
- The storage structure (see #2 below)
1. Let’s begin with style. Your two best options for styling (formatting) your digital notes are:
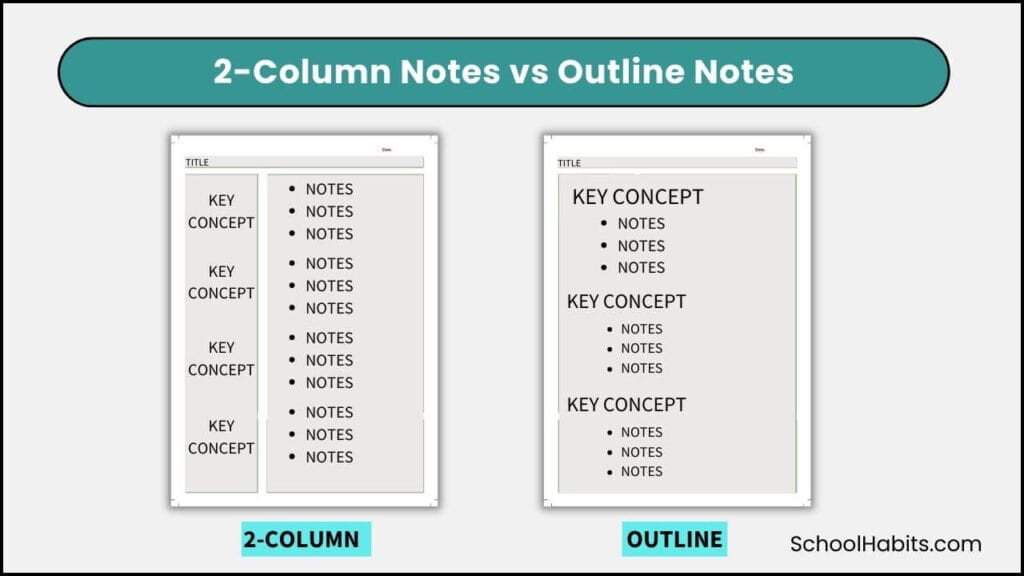
- Outline notes: Type from top to bottom in a single column, creating new headings and subheadings for each new topic.
- 2-column notes: Create two columns in your document by inserting a two-column table. Adjust the center line to make the column on the left narrower than the column on the right (see image). Add key terms, concepts and questions to the left column, and the details/explanation in the right column.
* Cornell notes don’t work well for typed digital notes, as the summary box at the bottom of the page becomes difficult to format.
2. Next, choose your storage structure. Again, you have two primary choices:
- Keep one running document of notes per class. Every time you take notes, open the document and type your notes in it. Add some space and a date between each entry.
- Create a new document for each note-taking session. Name your document to reflect the topic of notes and include the date.
Some students like to combine the above two methods and create a separate document for each unit. That’s an option too. There are pros and cons to each storage structure, and your personal preference matters. The important thing is that you choose one way and stick to it.
2. Create a Table of Contents
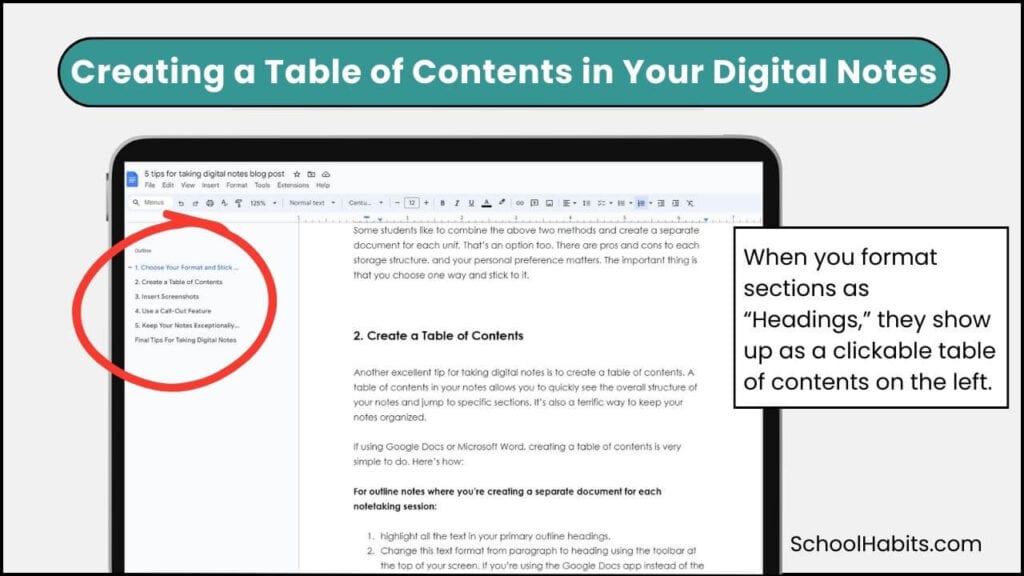
Another excellent tip for taking digital notes is to create a table of contents. A table of contents in your notes allows you to quickly see the overall structure of your notes and jump to specific sections. It’s also a terrific way to keep your notes organized.
If using Google Docs or Microsoft Word, creating a table of contents is very simple to do. Here’s how:
For outline notes where you’re creating a separate document for each notetaking session:
- Highlight all the text in your primary outline headings.
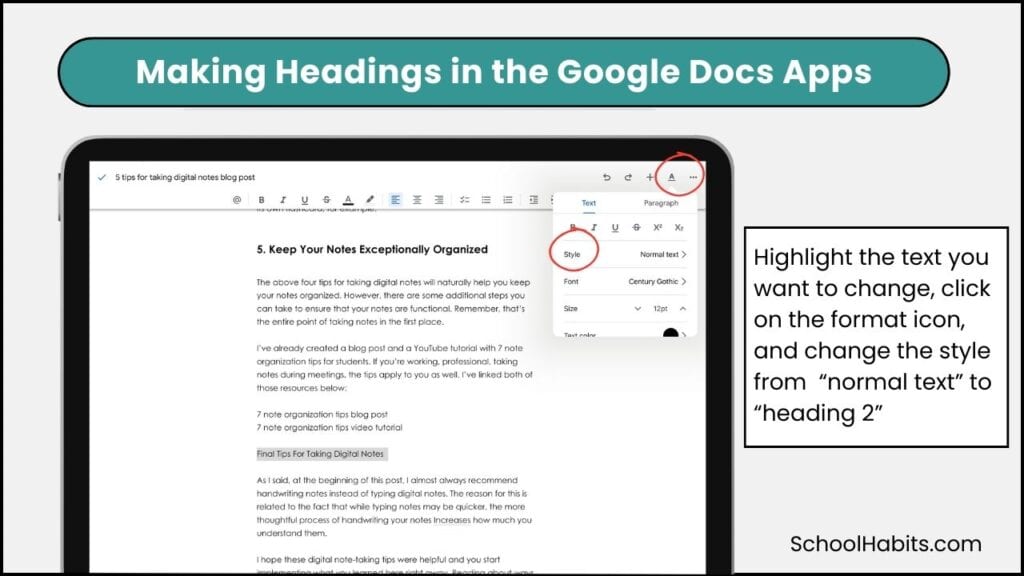
- Change this text format from paragraph to heading using the toolbar at the top of your screen. If you’re using the Google Docs app instead of the browser-based program, the steps are different. At the time of publishing, the process is to highlight the text you want to change, tap the format icon at the top of the screen (looks like A) and then change the style from normal text to heading.
- I personally prefer to use heading 2, as it’s a little smaller than heading 1.
- Consider bolding this text as well.
- Your table of contents will now appear on the left side of your document.
For outline notes, where you’re adding all notes to one document for the whole unit or whole semester:
- Highlight all the text at the top of each day’s entry. This should be the date and the topic of the lesson.
- Change this text format from paragraph using the toolbar at the top of your screen. If you’re in the Google app and not in your browser, see the steps in number 2 above.
- Consider using heading 2 instead of heading 1; bold the text.
- Your table of contents will now appear along the left side of your document.
For two-column notes:
If you’re creating a separate document for each note entry, follow the steps for outline notes above. However, you may need to add some heading text to your notes to signify the main topics. You would not create headings out of all of the terms in the left column of your two-column notes.
If you’re creating a single document of notes for an entire semester or unit, then follow the steps for outline notes above.
3. Insert Screenshots
One benefit of taking digital notes is that you can work with graphics and images much easier than if you are taking notes by hand. This argument is not strong enough to change my preference for handwritten notes, but I have to admit it is a benefit.
If your teacher puts graphics on the board or there’s a textbook image that would be helpful to include in your notes, take a screenshot or a picture to insert into your document.
A word of caution: Only include graphics and images that contain essential information. Taking pictures and screenshots is easy, which means it’s also easy to over-include them, cluttering your notes with nonessential information. You can always extract just the information you need from a graphic and include just that in your notes by typing it out.
4. Use a Call-Out Feature
Whether you’re taking two-column notes or outline notes, you should use a callout feature to make your notes more visually helpful.
In tip 2 for taking digital notes, I teach you how to create a table of contents. In a way, this is kind of like a callout feature. But, it can be helpful to use a callout feature in addition to the table of contents.
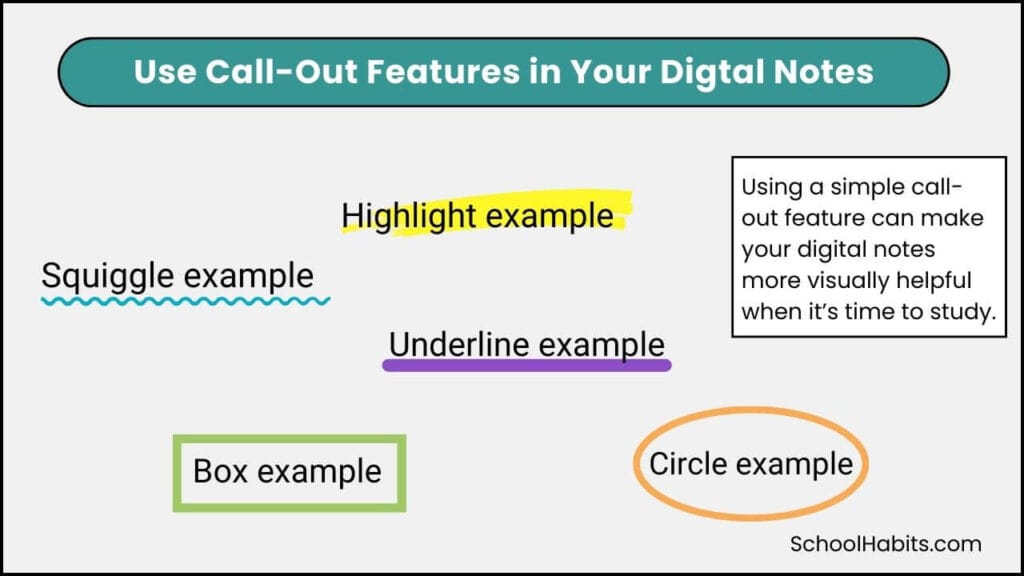
A call-out feature is a simple emphasis you add to main, subheadings, and very important information. It includes highlights, underlines, a different font, color, bold text, or larger text. The point of a call-out feature is that you can visually scan your notes and find critical information.
Adding call-out features to digital notes is helpful when it’s time to make study resources like flashcards from your notes. You’ll know that everything you’ve highlighted or underlined needs to be on its own flashcard, for example.
5. Keep Your Notes Exceptionally Organized
The above four tips for taking digital notes will naturally help you keep your notes organized. However, there are some additional steps you can take to ensure that your notes are functional. Remember, that’s the entire point of taking notes in the first place.
I’ve already created a blog post and a YouTube tutorial with 7 note organization tips for students. If you’re a working professional taking notes during meetings, the tips apply to you as well. I’ve linked both of those resources below:
Final Tips For Taking Digital Notes
As I said at the beginning of this post, I almost always recommend handwriting notes instead of typing digital notes. One reason is that while typing notes may be quicker, the more thoughtful process of handwriting your notes Increases how much you understand them.
I hope these digital note-taking tips are helpful and you start implementing what you learn here right away. Reading about ways to improve your school habits is wonderful, but improvement doesn’t happen without action.